Workouts Library
Premium training sessions guided by elite coaches for maximum physical conditioning
Body Firming HIIT Workout for Beginners Beginner HIIT Home Workout Routine Fitness Health Track
HIIT workouts are known for being wildly intense and wildly effective, but they aren’t notorious for catering to many fitness levels outside of that of the elite. Fitness Health Track’s Beginner HIIT Workout is by no means easy, but it does strive to accommodate those who are not quite ready to tackle those high intensity interval training routines that require full blown, 110%, total body exertion. For those that are well accustomed to regular cardio, this HIIT video will serve as a great routine to get the heart rate up and the muscles toned. On the other hand, if you are not an avid exerciser, this workout will be a great way to challenge yourself and take your fitness to the next level. This is a great routine for fat burning and muscle toning – an ideal way for a beginner to intermediate level exerciser to get the benefits of a HIIT plan without as much of the jarring impact or extreme, full out exertion periods. How to do this workout After a 4-minute cardio warm up, your muscles will be warmed and ready to work. That’s when we jump into the HIIT portion of our routine that engages the upper body, lower body, and core. Warm Up Exercises • Crossover Toe Touch Stretch • Standing Crisscross Crunches • Torso Rotations • High Kicks • Leg Swings, Front to Back HIIT Exercises • Jumping Jacks • Ski Squats + Kicks • Traveling Push Ups • Crossover Crunches • Fingertip to Toe Jacks Workout Structure: For the exercises in the highest intensity part of the routine, you will do 20 seconds on, and 10 seconds off, three times through. Then you will move onto the next exercise. After you have gone through all five exercises in the plan, you will get two minutes of active rest. For the active rest interval, make sure that you keep moving. You can march in place, do jumping jacks, or just pace around the room – just make sure that you don’t sit or lie down. Once your active rest period is over, you are going to repeat the HIIT exercises once more. How many calories does this Fitness Health Track HIIT workout burn? One of the biggest factors in how many calories any given program burns is the fitness level of the individual who is doing it – it’s all relative. For example, if you are out of shape, this routine may have you gasping for breath and sweating up a storm (actually it might even do that if you are in fairly good shape!). If you do this workout and find that that is the case for you, you are likely burning a higher number of calories per minute than the avid exerciser who just breezes right through the routine without feeling much of a challenge. With that said, we estimate that this video burns between 7-12 calories a minute, or 152-252 calories. This number will vary depending on your weight (if you weigh more than 190 pounds you will likely burn more than is given in the estimate above), your gender (men burn up energy at a higher rate), and lean muscle mass. How often should I do this workout? This is technically a HIIT routine because of the way that it is structured, but because it is for beginners, the exercises are not remarkably high impact. Because of that, you could do this workout video more often than you would a more typical high intensity interval training routine (three to four times a week, max for traditional versions). You could use this routine 5-6 days a week, though we do recommend that you choose a combination of other Fitness Health Track videos in order to keep your muscles guessing and the workouts maximally effective.
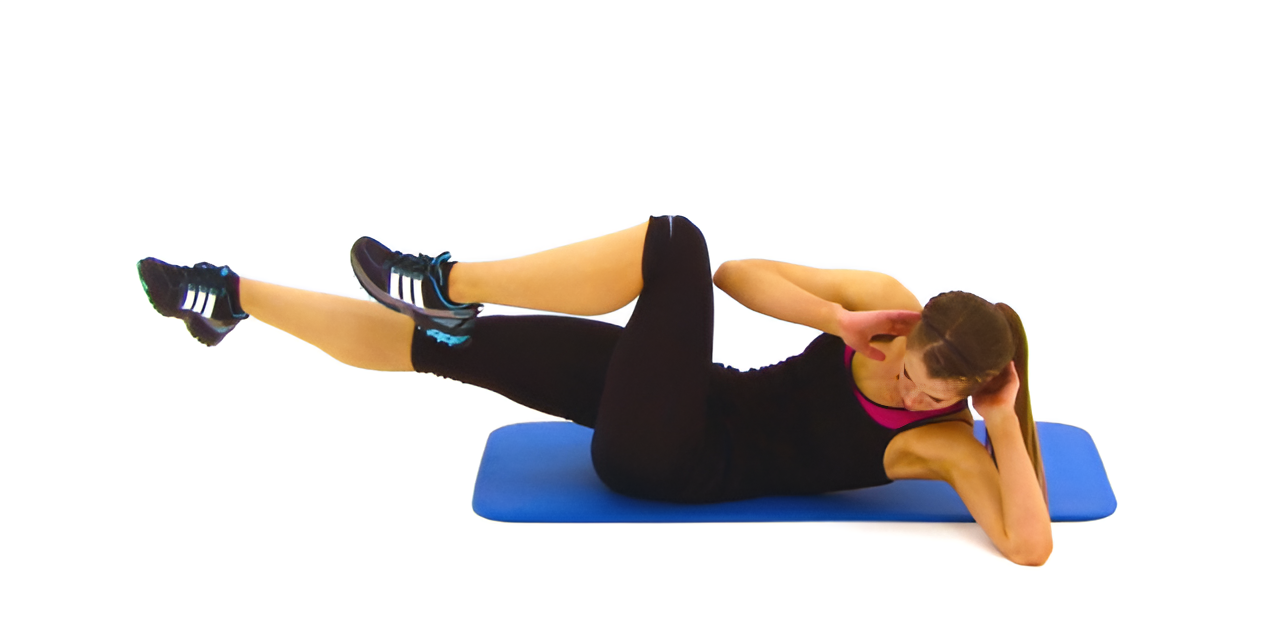
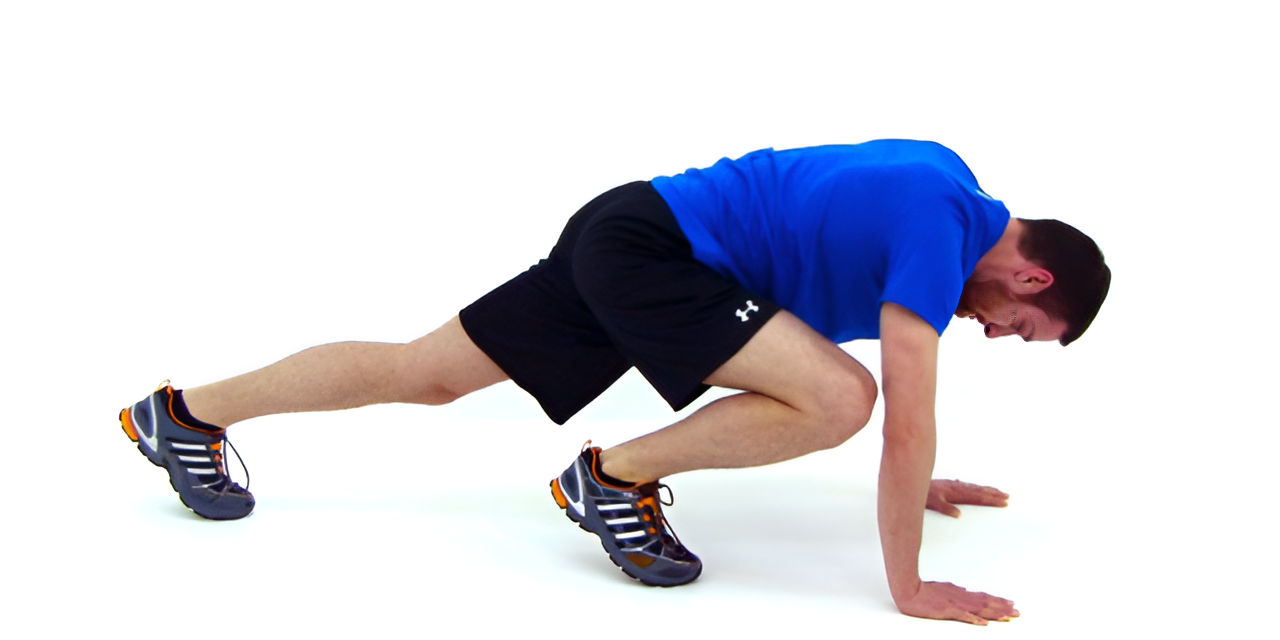
Agility Exercises to Increase Balance & Muscle Tone Advanced Balance Workout Fitness Health Track
Balance is an aspect of fitness that is often wrongfully underestimated when it comes to both competitive athletic performance and everyday quality of life. This Fitness Health Track Balance Workout is meant to challenge and improve the control that you have over your own body, making you a stronger, faster, and more agile competitor (or fitness fanatic). The exercises in this video are deceptively difficult. If you take just a quick glimpse at any given part of this video, you might find yourself wondering what the big challenge is. Try an exercise for yourself – the Single Leg Head Nods, with Eyes Closed, for example – and you will more likely than not find yourself struggling not to fall over. Why you should do this workout: Maintaining stability and being able to exert control over one’s body is a huge part of avoiding injury and falls, for both the elderly and the athletic. This workout also improves your coordination and your sense of spatial location. Aside from turning you into a more agile individual, this program will also help tone your body. To do this routine you will need: An exercise mat and a physioball How this workout is structured: This video has 5 different advanced balance exercises. There are two rounds of the entire routine for a workout that comes in at just over twenty minutes total. Advanced Exercises for Balance: Single Leg Head Nods; Eyes Closed – Deceptively difficult with your eyes closed, you may find that you need to get the hang of this motion with your eyes open first. Make sure that you do this in a safe place where you cannot fall or trip over anything, because you will lose your balance while attempting this one. Take your time; you don’t have to go at the same speed as we do in the video. Do 5 on each leg. Single Leg Agility Dots – Do 20 on each leg; 10 in each direction. If you don’t have tape or agility dots, just imagine that you are jumping around the box pattern. This one is a high calorie burner and great for toning the calves. Superman Lifts – Tap into your inner superhero with this one and hop onto that physioball. Again, make sure that you don’t have any breakables (or things that can break you) around while you do this. If you need to, do this on a Bosu ball to make it easier. Do 4 lifts of each limb, total. Physioball Kneeling Rotations – This one is tricky, and meant only for those who already have a solid foundation of coordination and core strength. If you want to make this one harder, hold onto a medicine ball or weight while you do the slow rotating motions. Plank Extension Tucks – From a push up position, tuck the right hand and left foot inward towards your core, and then back out into an extension. Do 8 repetitions on each side, without touching the ground in between repetitions, and the repeat on opposite sides of the body. If you want to make it easier, you can rest your limbs on the ground in between reps. How many calories does this workout burn? The exact numbers for each person will be different, but we estimate that this 20 minute workout ends up burning roughly 140-170 calories total. This routine would be great to do in combination with a cardio workout (see Fitness Health Track’s entire library of full length workout videos for ideas on cardio that you can do at home without any equipment). If this workout is too hard, try our Beginner Balance Workout.
At Home Kettlebell Workout Kells Kettlebells Routine Fitness Health Track
This 33 Minute Kettlebell Workout is a great option for those who are brand new to this unique kind of training. Kettlebell routines are recognized for burning a very high number of calories, all while building lean muscles. This video is no exception as it burns a good deal of energy and is also very well balanced in terms of muscle groups engaged. Make sure that you start out with slow motions and a light weight. This is important with Kettlebell training as injuries can easily occur. As you become stronger and more comfortable with the movements, you can make increases in both the amount of weight that you are lifting and the speed at which you complete your repetitions. Here’s a breakdown of the Kettlebell video: Warm Up – 3 Minutes • 1 Minute Jogging in Place • 1 Minute Slow Butt Kickers + Crossover Arm Swings • 1 Minute Jogging in Place + Forward & Backward Arm Swings Full Length Kettlebell Workout Routine – 30 Minutes • Around the World – 20 Repetitions in each direction: Stand nice and tall with feet slightly wider than shoulder width apart, and swing the Kettlebell around your body, passing it from hand to hand in a wide circle around your body to make the rotation. Go as quickly or slowly as you need to. • Kettlebell Figure 8’s – 14 Reps in each direction: Just like it sounds, you’re going to make a figure 8 around your legs. Focus on throwing the Kettlebell from hand to hand with your fingers facing towards one another. It’s a catching motion more than it is a passing-off. Start slowly with this exercise and speed the motion up once you become more confident. • Two Handed Kettlebell Swing – 20 Repetitions: Hold onto the weight with both hands, palms facing in towards your body. Go into a deep squat and use the power of your legs to drive the weight up to about shoulder height. Your shoulders will also be working to control the movement of the weight. Make sure that your back stays flat during this exercise. • Kettlebell Cleans – 14 Reps on each Side: Keeping your back flat, use the force from your legs to drive the Kettlebell upwards so that it lands on the outside of your forearm & bicep. Let it rest there just briefly before you drop it right back down for another rep. This one is great for your glutes, biceps, and shoulders. • Kettlebell Halos – 10 in each Direction: Hold onto the outside of the handle and bring it from one shoulder, behind your head, back down to the front of the opposite shoulder (making a halo shape). As soon as you reach the opposite side of your body, go back the other direction to end up where you started. Keep an even pace and keep the “halo” circle relative small and tight around your body. • Straight Leg Dead Lifts – 20 Reps: Keep a perfectly flat back and your legs straight. Use a slow and controlled motion to tip forward, so that the weight hangs dead a few inches from the ground, and then squeeze your glutes to come back up to a standing position. You will feel this predominately in your glutes and your lower back. • Squat Curls – 14 Reps: Dip into a deep squat, curling the Kettlebell at the bottom of the motion. Come back up from the squat, and let the weight hang as you extend your arms again. This is great for the upper body (particularly the biceps), the glutes, and thighs. • Bent Over Rows – 14 Repetitions on each Side: Again, you need a straight back for this one, aiming to keep your upper body parallel to the ground. Our intro warm up is relatively short; you may want to do a bit more cardio to prep your muscles for the workout. Make sure that you cool down and stretch thoroughly after this workout.
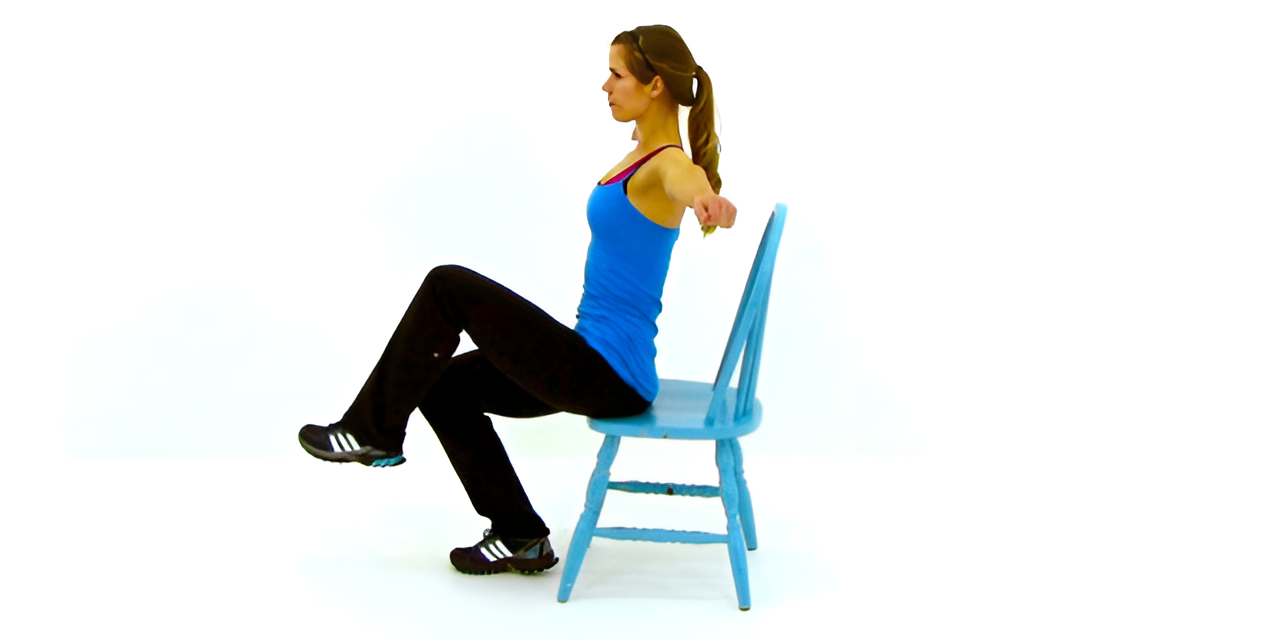
Workout at Work: 32 Minute Chair Workout Video Fitness Health Track
Our Chair Workout can be made very easy or fairly difficult, with just the tweaking of a few simple details. It targets all major muscle groups and is almost literally impact free. This is an excellent routine for anyone of any fitness level or age. From those who are trying to workout at work to those who are injured or trying to stay active with a health condition such as fibromyalgia or arthritis, this low impact workout is easy on the joints but still very effective for toning. Another bonus of this video is that it is built using moves that would be perfect desk exercises. It just happens to be the perfect length to squeeze into that lunch hour, which is quite possibly the best time to sneak in an exercise session (even if you only get a short lunch, you can just cut it a few reps short & clock back in on time). For those that want to increase the challenge of this largely seated workout routine, we recommend that you grab a pair of hand weights. Even if you don’t use extra resistance, you may still feel a challenge, particularly if you have not worked out in a while. Options to make this workout more difficult: • Focus on contracting the targeted muscle group throughout the entire range of motion for each exercise • Hold onto hand weights Exercises in this Chair Workout • Seated Toe Stretch – Stretch those hamstrings and lower back by scooting to the edge of your chair, leaning forward and reaching for your toes. Be careful with this one if you are using this as a cubicle workout & you have a chair on wheels! • Seated Toe Raises + Chest Presses – Keep your back straight and press your hands together as hard as is comfortable. While maintaining that inward pressure on your hands, drive your hands outward as you extend both arms. At the same time, rise up onto your toes so that you feel a contraction of your calf muscles. Bring your arms back in while at the same time dropping your heels back to the ground – all the while maintaining the pressing of your palms together. • High Knees + Lateral Raises – You will feel this one in both your hip flexors and shoulders. Keep a nice steady motion going and don’t “throw” your limbs or use momentum. • Seated Leg Extensions + Overhead Presses – One leg at a time, lift your thigh from your chair and then extend at the knee so that your leg is straight. At the same time, push both hands up above your head in a press. Come back down and immediately repeat the motion. • Seated Side Bends – Place one hand behind your head and extend the other arm out straight. Lean as far as you can control to the side with the extended arm, then squeeze through the obliques and abs in order to pull yourself back over for a stretch on the opposite side. Really focus on getting a squeeze in on each lean. • Russian Twists – Turn sideways in your chair so that you can lean back without the back of the seat being in your way. Lean back as far as you can control and rotate your shoulders as far as you can to the left and then right. Keep your hands in front of your body and your back straight. • Seated Swimmers – Tilt at the waist so that you are leaning forward from the edge of your seat, with your arms hanging loosely at your sides. Using as full of a range of motion as you can, bring your arms in a full circle so that they meet together, up above your head. Bring them back down along the sides of your body so that they return to their starting position; repeat. • Assisted Sumo Squats – These squats are very deep and very slow; you will feel them in your glutes and thighs. Use the chair for balance if you need to. Remember to keep your back straight and stick your butt out behind you in an exaggerated way. • Assisted Side Leg Lifts – Alternating from left to right, use a slow and controlled motion to lift each leg out to the side, using the chair for balance if necessary. Do not use a swinging motion to complete the movement. You will feel this in your outside thigh, obliques and glutes. • Assisted Hamstring Curls – Using a very deliberate movement, bend at your knee and contract your hamstrings to bring your foot up to your butt. Use the chair for balance if you need to, or increase the demand on your core by using minimal assistance to stay steady. How many calories does this Fitness Health Track Chair Workout Burn? We estimate that these low impact chair exercises burn between 4-7 calories a minute, or 128 and 224 calories total. If you use additional resistance or weights to do this routine, you could burn more than that.
Pyramid HIIT Workout Fun with Numbers Workout Fitness Health Track
Though we like using a Tabata style High Intensity Interval Training (HIIT) structure for many of our interval workouts (20 seconds on 10 seconds off) it is always a good idea to switch it up on a regular basis to challenge your body in different ways. This Pyramid HIIT workout does just that by taking the idea of a timed set that is typically used in intervals and blending it with a pyramid workout structure commonly used with a repetition based strength routine. A typical Pyramid workout structure looks like this; using an odd number of sets (5-11 or more per exercise) you start with a small number of repetitions then add repetitions every set until the middle set, then work your way back down until you end with the same number of repetitions you started with. For example a 5 set pyramid might look something like this: Set 1: 6 Repetitions Set 2: 10 Repetitions Set 3: 14 Repetitions Set 4: 10 Repetitions Set 5: 6 Repetitions With this routine we have taken that idea and turned it into a HIIT workout by using the same structure but with timed intervals instead of repetitions. So the structure for each exercise of this routine will be this: 15 Seconds Active 15 Seconds Rest 30 Seconds Active 15 Seconds Rest 45 Seconds Active 15 Seconds Rest 30 Seconds Active 15 Seconds Rest 15 Seconds Active 10 Seconds Rest/Set up for next exercise By the time you are done you will have completed a total of 2 minutes and 15 seconds of each exercise but using varying lengths of effort. By using this structure and breaking up your effort into manageable sections and only taking minimal rest periods you can effectively do more work and burn more calories than is possible by simply completing the exercise once through without stopping. The key is not completely exhausting yourself as this slows your ability to burn calories because you are too tired to continue performing the motion to its fullest extent. This concept is why any HIIT program (especially this one) is better at burning calories than a traditional set and repetition based workout program. Workout Structure This routine consists of a warm up followed by two groups of three exercises (6 total) then a short cool down. The following is a quick rundown of the exercises we will be using and what muscle groups they target. Group One • High Knees: This simple exercise is fantastic for getting your heart rate up fast. To get the most out of it be sure to quickly transition one foot to the other while driving the knees up as high as you can. • Toe Touch Crunch: This abdominal exercise is great for effectively targeting the upper and lower abs as well as forcing the hip flexors and quadriceps (front of thigh) to work, increasing your over all calorie burn. • Burpee Push Up: If you have ever done a Burpee you know this is an effective total body exercise that leaves you panting in no time. By adding in a push up you increase your intensity by using even more large muscle groups, drastically increasing your overall calorie burn. Group Two • Squat and Pass: This exercise couples a traditional squat with a shoulder exercise to not only increase the overall effort of the squat, also to change the leverage of the motion to work your legs just a bit differently than a squat alone. • Back Bow: This Pilates exercise targets almost every muscle group through the back of the body, from the rhomboids and deltoids on the shoulders and upper back all the way down through the lower back to the butt and hamstrings. It may look like a simple motion but is killer for back strength and a great calorie burner. • Mt. Climbers: This exercise is right up there with burpees as far as difficulty and calorie burn goes. This is a killer for the core, hip flexors, and quadriceps and also gets a good burn in the shoulders. To get the most from this exercise be sure to keep your feet moving as quickly as possible and once you burnout don’t stop, just switch to moving one foot at a time rather than simultaneously. Calories burned We estimate that this cardio & abdominal routine burns between 9 and 14 calories a minute. The exact expenditure will depend on your weight, gender, muscle mass and many other variables.
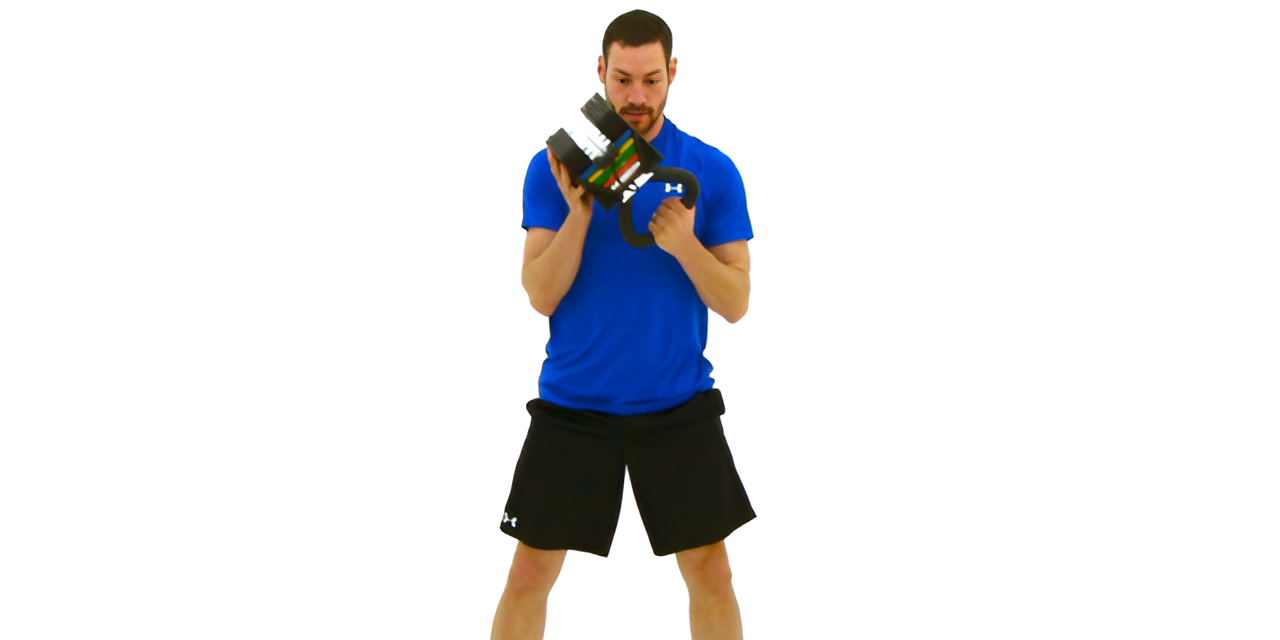
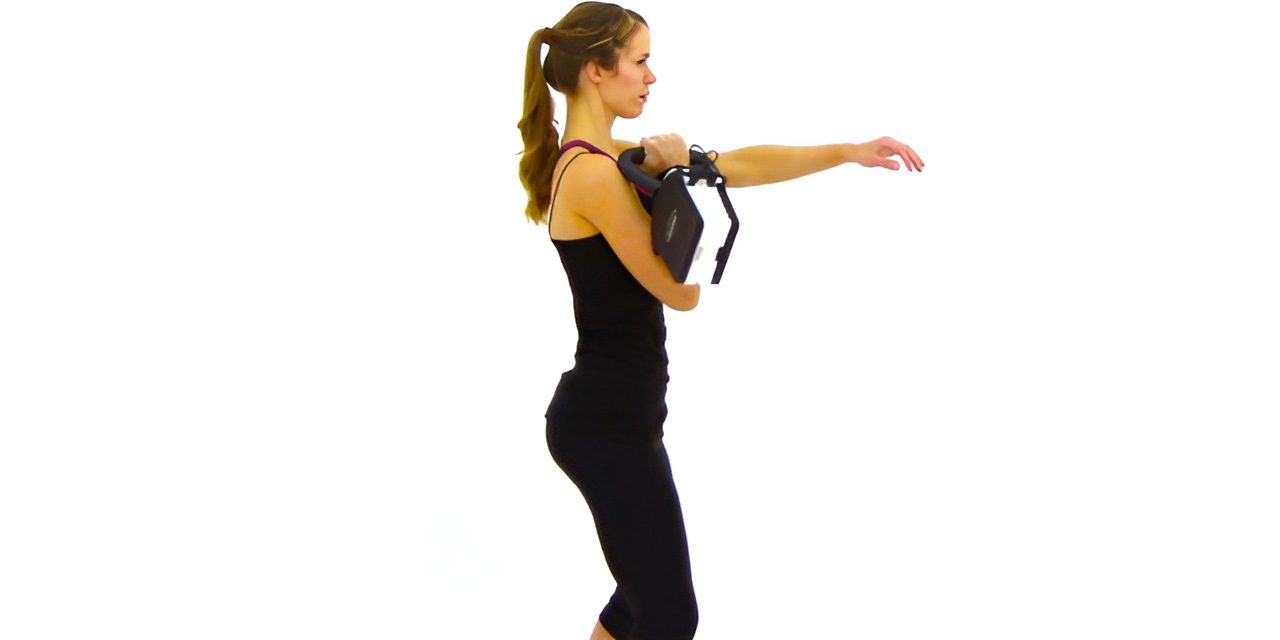
Kettlebell HIIT Workout HIIT Kettlebell Training Fitness Health Track
If you have ever worked with Kettlebells before, you know that they can provide a very intense workout in a little amount of time, similarly if you have ever done High Intensity Interval Training (HIIT) then you know that it also has the ability to quickly and effectively burn a lot of calories. With this routine we have combined these two powerhouse training styles to create one quick and effective calorie-burning workout. With this style of workout you need to be sure that you do not overtrain. It’s important to be careful that you do not do this routine more often than your body can handle, which would lead to stress injuries that can slow down your progress or even keep you from exercising at all. Since everyone’s body is different when it comes to it’s ability to heal and avoid injury, you will have to listen to your own body when making the call as to how often you can get away with performing this workout. We generally suggest that this style of routine not be done more than 2 to 4 times per week. Because many Kettlebell exercises are explosive in nature they should never be used as the sole component of a workout regimen unless the routine has been properly built to include non-explosive movements as well, as using only explosive movements will inevitably lead to injury. The same can be said for the HIIT routines as well, so just be sure to incorporate an even amount of moderate, lower impact activity throughout your weekly fitness program. For this routine we start out with a short 7 minute warm up designed to not only increase blood flow to the extremities but also to open up the joints (increase range of motion) that will be used the most through this workout. Once your heart rate is elevated a bit and your body is warmed up we will start into the Kettlebell HIIT workout. This portion consists of only three different motions (which are explained in detail below) with a 40 second active period with a 20 second rest in between. As you become stronger you can change this interval to 45 seconds on and 15 seconds off or even 50 to 10. Once the intervals are done we have a short stretching section that targets the muscles most heavily used in this routine. You can stop here or add in a cardio or core workout to extend your calorie burn even more. The exercises used in the Kettlebell HIIT routine are as follows: 1. Clean and Press: This motion is done with one arm at a time and is a two stage motion. The first motion brings the Kettlebell up to the shoulder and the next presses it over the head. This is a great leg and shoulder workout that primarily targets the quadriceps, glutes, lower back, deltoid and tricep. 2. Full Swing: This full body motion is a double-handed swing that brings the kettle bell directly above your head at the top of the motion. Driven from the legs, back and shoulders this motion is a great totally body exercise that will get your heart pumping and burn massive amounts of calories. 3. Figure 8 Curl: This motion is not only a good calorie burner but it is also great for building core control and overall coordination. This figure 8 motion also incorporates a quick jerk/curl motion to add an extra arm and core component. This half hour routine burns calories to varying degrees throughout but on average burns around 8-14 calories per minute depending on your height, weight, and muscle content as well as the amount of weight you use for the Kettlebell exercises.
Shoulder and Neck Exercises and Stretches Fitness Health Track
A tight, sore neck and achy shoulders have become a regular occurrence for many people, especially those with desk jobs who spend most of their time on a computer. The constant strain on the neck, shoulders, upper back, and lower back from sitting in the same position all day long is something that is difficult to avoid, but with a little work, this strain can be minimized and kept from turning into a full blown pain in the neck. This neck and shoulder workout routine has two separate parts to help prevent and alleviate the tension and pain caused by prolonged desk work. The first section addresses neck and shoulder strength and endurance, as the neck is a common weak spot for most people. This section is specifically designed to build overall strength without building mass by keeping weight low and repetitions high. Here is a short description of what each exercise is for. Prone Chin Tuck: This strengthens the muscles through the front of the neck, building endurance as well as helping to maintain and/or improve flexibility. Supine Head Raise: This reverse motion of the Prone Chin Tuck focuses on the primary muscle used to keep the head up, and builds strength and endurance for prolonged use. Side Head Raise: The muscles in the sides of the neck also help to support the neck and when strengthened can help relieve the stress on the back of the neck. Back Bow: This motion targets the lower back to help alleviate the stress associated with sitting or standing for long periods of time. Reverse Fly: When done in high repetition and with light weight, this exercise helps to build endurance in the trapezius, rhomboids, and rear deltoids, pulling the shoulders back and up to hold the shoulders in a more natural position. Rotating Shoulder Shrug: This trapezius exercise helps hold the shoulders up, keeping them from drooping, which is a common cause of pain and fatigue. The second section addresses flexibility, not only as a means of relieving the symptoms of tight neck and shoulder muscles, but also preventing the muscles from becoming tight in the first place (especially when done on a regular basis). Use this section on its own to get immediate relief from tight muscles or use it in conjunction with the strength component to reduce the severity of future issues or to prevent them all together. Here is a short description of what each stretch is for. Wall Chest Stretch: The chest muscles are generally stronger than their opposing upper back muscles, and can pull the shoulders forward, causing extra strain on the neck and back. This stretch reduces that strain by loosing the chest and allowing the shoulder to move back into a more natural position. Wall Shoulder Stretch: The Latissimus Dorsi and other muscles that connect to the shoulder and arm can pull the shoulder down when tight and this stretch increases their flexibility, reducing the stress on the neck. Three Way Neck Stretch: This stretch focuses directly on the neck, targeting the front, back, and sides all at once. Cobra Stretch: Having tight hip flexors and abdominal muscles pull the torso forward, increasing the stress on the lower and upper back, especially while standing. This stretch increases the flexibility of the hip flexors and abdominal muscles, lowering the strain on the upper and lower back. Doing both parts of this routine four times a week for a month will quickly build endurance, strength and flexibility to alleviate chronic neck and shoulder pain. After the first month, drop down to one to two times per week to maintain your endurance and flexibility. When first starting the strength component of this routine you may not be able to do all 14 repetitions of each exercise. If not, just do as many as you can and increase the reps as you get stronger. As 14 repetitions becomes easy for you, you can start to increase your repetitions to build even more endurance. As long as you increase repetitions and don’t add any weight to the exercises you will never have to worry about building the size of your neck. However, if you are looking to dramatically increase the strength (as well as size) of your neck, build up to 20+ repetitions on each set, then drop back to 14 repetitions (or less) and add a small amount of weight (1-2 lbs) by holding it on your head supporting it with your hands.
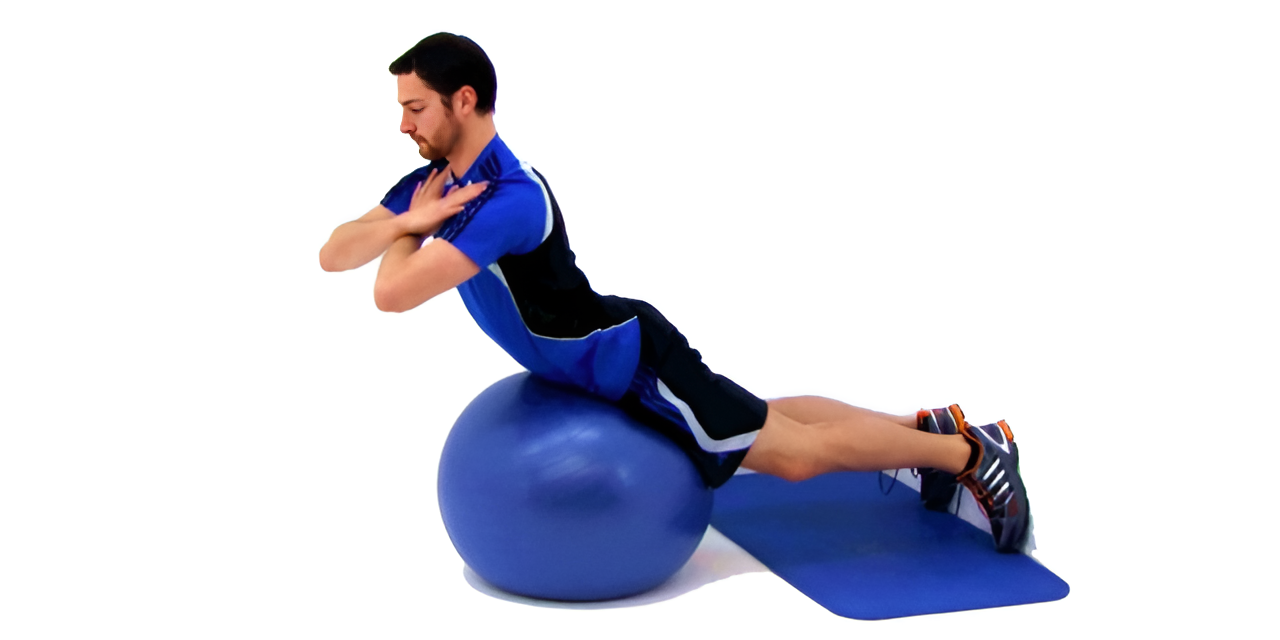
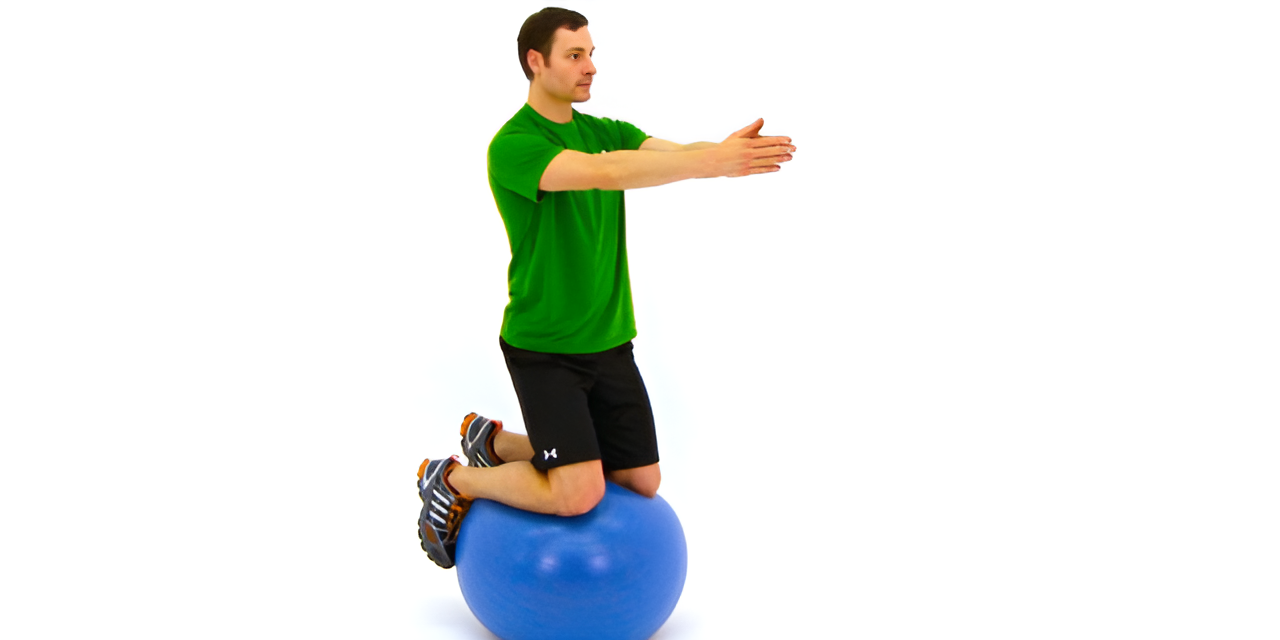
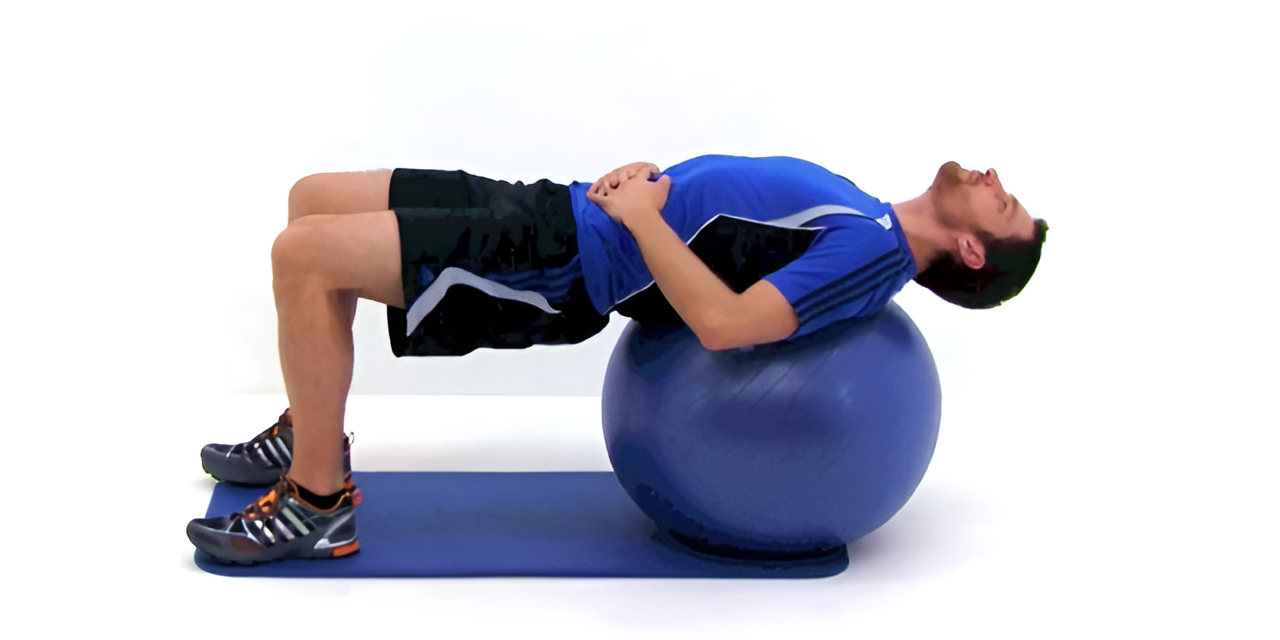
Total Body PhysioBall Workout PhysioBall Exercises Fitness Health Track
There are multiple advantages to using a PhysioBall to supplement your exercise routines. One is that it allows for more range of motion than you would get from most exercises without the use of the ball. For example, PhysioBall back extensions allow you to work a more full range of movement by allowing you to enter a plane of movement that you otherwise can’t without some kind of equipment. PhysioBall workout routines also burn more calories than the same exercises done without the ball. This is largely because of the instability that the piece of equipment creates. Any time you make your balance more instable, your body and muscle have to work harder to complete a motion without falling over, which uses up more energy (calories). The extra demand for balance also forces the body’s small controlling muscles to work harder, which actually serves to improve muscle tone and increase your overall balance and coordination as well as control over your own body. Yet another benefit of this simple piece of equipment is that it helps you target muscle groups that are otherwise hard to thoroughly engage without a piece of equipment. For example, the PhysioBall Hamstring Curls are a fantastic way to really get the backs of those thighs burning. Most of the other exercises that target hamstrings so specifically are big bulky pieces of equipment. Exercises in this routine: Wall Oblique Crunches – This one can take a little getting used to as you learn how to both balance and find a comfortable way to stack your feet. This is probably the exercise that takes the most practice so don’t be afraid to use the tips in the video and pause it if you need to while you let yourself get familiar with the position. This one is great for your obliques and is a good example of an exercise where the PhysioBall significantly improves the range of motion available. Back Extensions – Tone up the lower back muscles & strengthen the back. Because you have to stabilize yourself on the wobbly ball, your glutes & hamstrings also get a workout. Crunches – This takes a regular abdominal move and drastically improves its effectiveness and scope in terms of number of muscles engaged and depth of engagement. Wall Squats – Using the physioball to do this exercise works the muscles in a different way than a regular squat does. It also makes it easier to keep the knees from going into potentially compromising positions. Hamstring Curls – Between the balance required to complete this motion, and the strength it takes to get your heels under your butt, this is one of the best exercises for toning the backs of thighs. Push Ups – Again, because you have to work to balance yourself, this engages muscles in a different way than a regular Push Up does. Rows – The Row targets the rhomboids and deltoids in the upper back, offsetting the Push Ups that target the chest muscles. All in all, this PhysioBall workout routine is a fantastic total body plan that will tone you up fast. You will also be burning calories at a higher rate than if you were doing the traditional version of each exercise, and you are going to be improving your balance and overall comprehensive core strength, which is important for good posture and avoiding injuries as you move through exercises and every day activities. For best results, do this routine 2-4 times weekly along with a cardio component.
Lower Body Strength with Glute Focused Burnout Round 43 Minute Butt and Thigh Workout Fitness Health Track
Looking for a beast of a lower body workout? Well, you may have just found what you are looking for. This lower body workout can be used for toning, strength, or mass building, so you can use it for exactly what you need. In this routine we have broken the workout into three groups (not including the warm up and cooldown). The first two groups will be done in an interval style of 45 seconds of activity with 15 seconds of rest to prepare for the next exercise. Each of these first two groups have 4 exercises each and will be done in an alternating A,B A,B pattern, alternating back and forth between two of the four exercises at a time. Each exercise will be done for a total of three sets each before moving onto the next exercises, giving us a total of 12 intervals each for the first two groups. The last group before our cooldown and stretch will be done differently. Though there are again four exercises in this group, we will instead do each exercise for just one set using intervals of 60 seconds on and 15 seconds rest. This combination of two groups using a more traditional three sets per exercise followed by a group using a single burnout set will allow us to effectively fatigue the muscles to the point where we can get the micro tears in our muscle that lead to an increase in strength and mass. With that being said, remember that you can control exactly what results you get from this routine by adjusting the weight you choose to lift and how quickly you do each repetition. For a more toning-focused workout, use body weight only or very light weight and move more quickly (as long as you are still moving with control and not using momentum to help complete the movement being performed). If you want to focus more on building overall muscle size, then keep your movements slow and choose the heaviest weight you can control through a full range of motion. With mass building your goal should be to get through 90-100% of each of the first two sets (of any given exercise) before your muscles start to give out and your form starts to suffer. The goal for the third (last) set of each exercise should be to complete 80-90% of the interval before your muscles give out. If you want to just focus on general strength without necessarily increasing the size of the muscle being worked then pick a weight somewhere in between the two options above. This was a great workout for me and made my legs and glutes nice and sore the next day, so I hope you enjoy it as well. Let us know what you thought of this workout in the comments below. Workout Structure: – 3 Groups with 4 Exercises Each – 3 Sets per Exercise – Intervals of 45 Sec On and 15 Sec Rest – Group 3 is 1 Set at 60 Seconds per Exercise Equipement: – Dumbbells Warm Up / Cooldown: – Both Included Warm Up: 5 Minutes (30 Seconds Each) – Side Step w/ Overhead Reach – Toe Touch Sweeps – Slow March – Ice Skaters (L) – Ice Skaters (R) – Squat Push Pull – Alternating Warrior – Straight Leg Deadlift – Single Leg Deadlift (L) – Single Leg Deadlift (R) Workout: 30 Minutes (Intervals of 45 On, 15 Off; 3 Sets Per Exercise) Group 1: – Sumo Squats – Curtsy Lunge + Side Leg Lift (Alternating) – Straight Leg Deadlifts – Reverse Lunge + Front Leg Raise (Alternating) Group 2: – Basic Squat – Side Lunge (Alternating) – Straight Leg Deadlifts – Wide Stance Toes Out – Staggered Squat Group 3: Glute Burnout Round (One Set Each, 60 On 15 Off) – Double Pulse Lunges (alternating) – Reverse Lifts + Pulses (Left) – Reverse Lifts + Pulses (Right) – Bridge Cooldown: 5 Minutes (30 Seconds Each) – Overhead Reach and Bend – Standing Quad Stretch (L) – Standing Quad Stretch (R) – Toe Touch – Inside Thigh Stretch (L) – Inside Thigh Stretch (R) – Seated Toe Touch w/ Side Bend (L) – Seated Toe Touch w/ Side Bend (R) – Deep Glute (L) – Deep Glute (R)
Strictly Strength Upper Body Circuits Fitness Health Track
Bring your light and medium weight selections to this strictly strength training, upper body-focused workout. The only (optional) jumping occurs during the warm-up, but the circuit-style training format will keep your breathing and heart rate elevated as you alternate between push and pull exercises in each circuit. Circuit training is a great fit for time-crunched days during which you want to cover multiple muscle groups in a single workout. If properly planned, you can perform several exercises back-to-back with minimal rest between moves, without fully exhausting a particular muscle or group of muscles. There are a total of four circuits in this workout, two of which focus on unilateral movements to challenge your core/balance and provide an extra level of fatigue to muscles recruited in the preceding circuit. Circuit #3 is comprised predominantly of combination exercises, forcing you to rely on similar muscle groups to complete two moves in one. The exercises included in this workout are straightforward; however, the sequencing and formatting of said exercises is what increases the difficulty level of the routine (as well as your weight selections). A few tips to prepare you for this workout: • Overhead presses: be mindful that we are starting with Arnold Presses, a movement that requires full shoulder muscle recruitment. In the circuit that follows, you will complete single-arm Overhead Presses. Don’t be afraid to go with a lighter-than-usual load or adjust your weight choices throughout each circuit for these overhead movement patterns. We are fatiguing the shoulder muscles early in the workout as it pertains to overhead exercises to ensure proper form and minimize exhaustion from other exercises. If your shoulders require extra warming up or light intensity movements prior to lifting, please extend the warm-up with movements that are appropriate for your current training goals and needs. • Push-ups: there are two push-ups variations in this workout, one in Circuit #1 and the other in Circuit #3. You can use a stable, inclined surface to alleviate some of the pressure on your shoulders, chest, and triceps, but if you choose to do so, alter the Sphinx Press-Ups to Up-Downs for a comparable experience. • Tempo: maintain an even tempo throughout each lift except for the Bottom Pause Push-Ups. • Weight selections: I recommend using your medium weight selection for Circuit #1 and #2 and your light weights for Circuit #3 and #4. These recommendations are based on what weight selections should ensure a challenging but doable experience with proper, safe form; however, you should ultimately determine what works best for you. Always remember that the differential between my weight selections is more important than the actual weight itself when guiding you in your own choices. • Take breaks: reset your posture and relieve grip tension as needed! If you are having difficulty making it through at least four reps without a break, decrease your weights, get rid of your weights, or pause the video for an extended break. Challenge yourself, but have fun with this workout! This is a great workout for days when you want to tune in your focus to technique and upper body strength. And yes, I dislike the Sphinx Press-Ups just as much as you do, but they were already written on the filming whiteboards so there was no going back to change them. Workout Warm-Up: 30 sec per exercise, no rest between exercises (7:00) – Jump Rope – Arm Circles – Forwards (both arms at once) – Squat + Torso Rotations (in squat position) – Jumping Jacks – Inchworm + Reverse Fly – Down-Dog + Shoulder Taps (alternating taps) – Double Pulse Running Man ————————————————— – Lateral Taps + Crossbody Reaches – Arm Circles – Backwards (both arms at once) – Squat + Pull-Down – Jumping Jacks + OH Swing – Inchworm + Push-Up – Down-Dog + Lateral Raise (alternating raises) – Running Man Circuit Format: 45 sec on / 15 sec off / 2 rounds (no extra rest between rounds) – My weight selections: medium – 15 lbs. (6.8 kg) / light – 10 lbs. (4.5 kg) OR 8 lbs. (3.6 kg) Circuit #1: One Exercise (medium weights) – Arnold Presses – High Wide Row – Bottom Pause Push-Ups Circuit #2: Single-Arm (medium weights) – Single-Arm Overhead Press – R – Single-Arm Low Row – R – Single-Arm Overhead Press – L – Single-Arm Low Row – L ***Water Break*** Circuit #3: Combination Exercises (light weights) – Hammer Curl + Reverse Fly – Forward Raise + Lateral Raise – Sphinx Press-Ups Circuit #4: Single-Arm (light weights) – Single-Arm Biceps Curl – R – Single-Arm Scaption – R – Single-Arm Biceps Curl – L – Single-Arm Scaption – L Cool-Down: approx. 30 sec per stretch (approx. 5:30) – Shoulder Rolls (forwards and back) – Neck/Traps Stretch – R – Neck/Traps Stretch – L – Alternating Cross-Body Hugs – Chest Opener Stretch – Hug the Tree (rounded spine) – Overhead Triceps Extension Stretch – R – Overhead Triceps Extension Stretch – L – Arms OH – Lats Stretch – R – Arms OH – Lats Stretch – L – Gentle Spinal Twists
Single Weight Upper Body Fitness Health Track
Target the major muscles of the upper body using one weight at a time in this short, single circuit routine. You’re only completing the five-exercise circuit twice so challenge yourself to lift heavy (for you) while paying close attention to muscular imbalances and compensations that often occur with unilateral work. Remember that performance differences between the right and left side of the body are usually not solely derived from strength deficiencies but are also related to inefficient patterns of daily movement done with high repetition. Consider: • How you sit while working, watching tv, and eating — do you maintain an upright, open posture? • Your walking gait — do you swing your arms in tandem with your legs? Cross your arms? • How you initiate most movement — do you use one side of your body more than the other to get moving? To stand up? Just know that there’s no perfect ideal for movement (just generalized guidelines that fit many folks) and that each person’s unique frame, body composition, and existing/pre-existing injuries are all factors that contribute to determining a non-injurious flow of movement for that individual. The key to improving bilateral movement performance is seeking pain-free adaptations and being open to the fact that movement often changes across the lifespan. In this workout, you will complete two moves that involve handing the weight off from one hand to the next (low rows and biceps curls). Brace your core during the transition and keep your shoulders and hips in alignment to minimize twisting and placing unnecessary tension on the lower back. The other three moves in the circuit focus on one arm at a time (overhead presses, biceps curls). For these three exercises, be mindful of maintaining your natural slight hip tuck (core braced) to create a cylinder of support from the transverse abdominus (deep abdominal muscles). If your lower back starts to ache and/or you find the two-foot stance difficult, tighten your abdominal muscles and/or opt for a kickstand position to offset the pressure in the lower back (kickstand = keep the foot on the same side as the weighted arm flat, drag the opposite leg slightly behind you and lift the heel). Tack this workout onto a short lower body, core, or cardio routine or enjoy it as a stand-alone challenge for the day. However you choose to tackle this workout, note that there is a short one-minute finisher at the end involving jumping jacks. The finisher is the only time during the entire workout that you’re gifted with an opportunity to jump — maximize it, revel in it, or omit it. Your choice! Workout Warm-Up: 30 sec per exercise, 2 rounds, no rest between exercises or rounds (4:00) -Arm Circles (freestyle and backstroke) -Squat with Overhead Press -Hinge + Reverse Fly -Inchworm + Forward Raises My weight selections (not a recommendation, just a reference): -Heavy = 20 lbs. (9.1 kg) -Medium = 15 lbs. (6.8 kg) -Light = 12 lbs. (5.4 kg) Upper Body Circuit: 45 sec on / 15 sec off / 2 rounds (Water Break after round 1 and 2) -Low Row (alternating, weight handoff) -Overhead Press: Neutral + Military – R -Overhead Press: Neutral + Military – L -Lateral Raises (alternating, weight handoff) -Rotating Biceps Curl (round 1 = R; round 2 = L) ***Water Break*** (after round 1 and 2) Finisher: 1:00 -3 Jumping Jacks + 1 Snatch/High Pull (alternating snatches/pulls) Cool-Down: approx. 30 sec per stretch (approx. 4:00) -Shoulder Rolls (forward and back) -Crossbody Shoulder Stretch – R -Crossbody Shoulder Stretch – L -Neck/Traps Stretch – R -Neck/Traps Stretch – L -Chest Opener Stretch + Hug the Tree -Spinal Roll Down -Gentle Spinal Twists
Upper and Lower Back Workout — At Home Back Exercises to Tone & Strengthen Fitness Health Track
Far too many people focus on abdominal work, and then completely neglect the complementary back muscles. Aside from all of the superficial benefits in regularly training this particular aspect of your core, strengthening your back muscles can play a huge role in warding off lumbar pain, stiffness, and injury. Make sure that you warm up before jumping right into this home workout video with at least 5 minutes of light cardio. Back Bows – This Pilates exercise is a great way to use your own bodyweight to tone your upper and lower back. As an added bonus, lifting your legs up off of the ground, along with that upper body, ends up toning your obliques, glutes, and hamstrings as well. Russian Twists – Doing the twisting motion at an angle engages your entire core; obliques, abdominals, and general lumbar region. You can easily make this more challenging by holding onto a dumbbell through the motion, or by lifting your feet up off of the ground and balancing on your tailbone. Pilates Swimmers – While the primary benefit of is that these are a low impact way to engage both the lower and upper back simultaneously, these actually end up being a total body exercise. It might take a few awkward motions before you get your arms and legs in synch, so don’t get frustrated if you take an extra few seconds to get your upper & lower body coordinated. Make sure that you use smooth, controlled motions and never jerk in order to get more range of motion as this can increase the likelihood of injury. Roll Downs – Standing tall with a light pair of dumbbells, roll your upper body down towards the ground as far as you can before uncurling as you come back up. Make sure to roll shoulders forward and focus on “rolling” your back down downwards, keeping your chest and shoulders relatively close to your thighs. As long as you choose a light weight, this is great for your lower back. Kneeling Supermans – This is a low impact back exercise that feels great as a sort of a partial stretch. Make sure and squeeze at the top of each motion in order to get the most toning from the movement – not only in the upper and lower back, but also in the glutes. Reverse Fly – For this motion that targets the rhomboids of the upper back, keep your back flat and a slight bend in your knees. Aim to get your arms just above the level of your chest, with your hands roughly out at the level of your ears. If you don’t have dumbbells, don’t let that stop you; you can always use resistance bands, water bottles, or cans of soup. Physio Ball Back Extensions – For this one, you will need an open wall in order to steady your feet as an anchor to complete the extensions over the ball. Make sure to get as full a range of motion as you can by wrapping forward over the Physioball as far as you comfortably can before raising back upward. Controlled, slow motions should be your priority with this movement. Medicine Ball Pendulum Swing – Keep your back and legs straight for this motion, rotating very slowly in order to fully engage the back and obliques. This should not literally be a “swing”; you should be in full control of the movement through the entire range of motion – do not use momentum. If you don’t have a medicine ball, a dumbbell works just as well. Make sure that you stretch thoroughly after this workout. Though the key muscle groups in this workout are the lower & upper back, most of the exercises are dynamic enough that they end up incorporating many other muscles, bumping up the calorie burn a bit; we estimate that this routine burns 165-210 calories total.